MinimaList: simple shopping list app – Flutter frontend
Introduction
Hi! In today’s post, I’ll be building the frontend for the MinimaList app, whose simple backend demo was created in the previous post. The technology I’ll be using for the build is Flutter. To manage the app’s state and its elements, I’ll be using the Bloc library. I’ve never used it before, so this is a learning opportunity for me. It’s the most advanced and feature-rich state management library in the Flutter ecosystem.
My app won’t be complicated—my main goal is to learn and focus on rapid development. The application will not be fully complete, consider it more of a demo. I won’t be showing all the code, as much of it will be quite basic, and explaining every piece would make the post far too long.
Let’s get started! 🚀
Architecture
Following the Bloc documentation, the application architecture will adhere to a three-layer structure: data, business, and presentation. This is a standard pattern in state management and aligns with my previous experiences using libraries such as Provider and Riverpod.
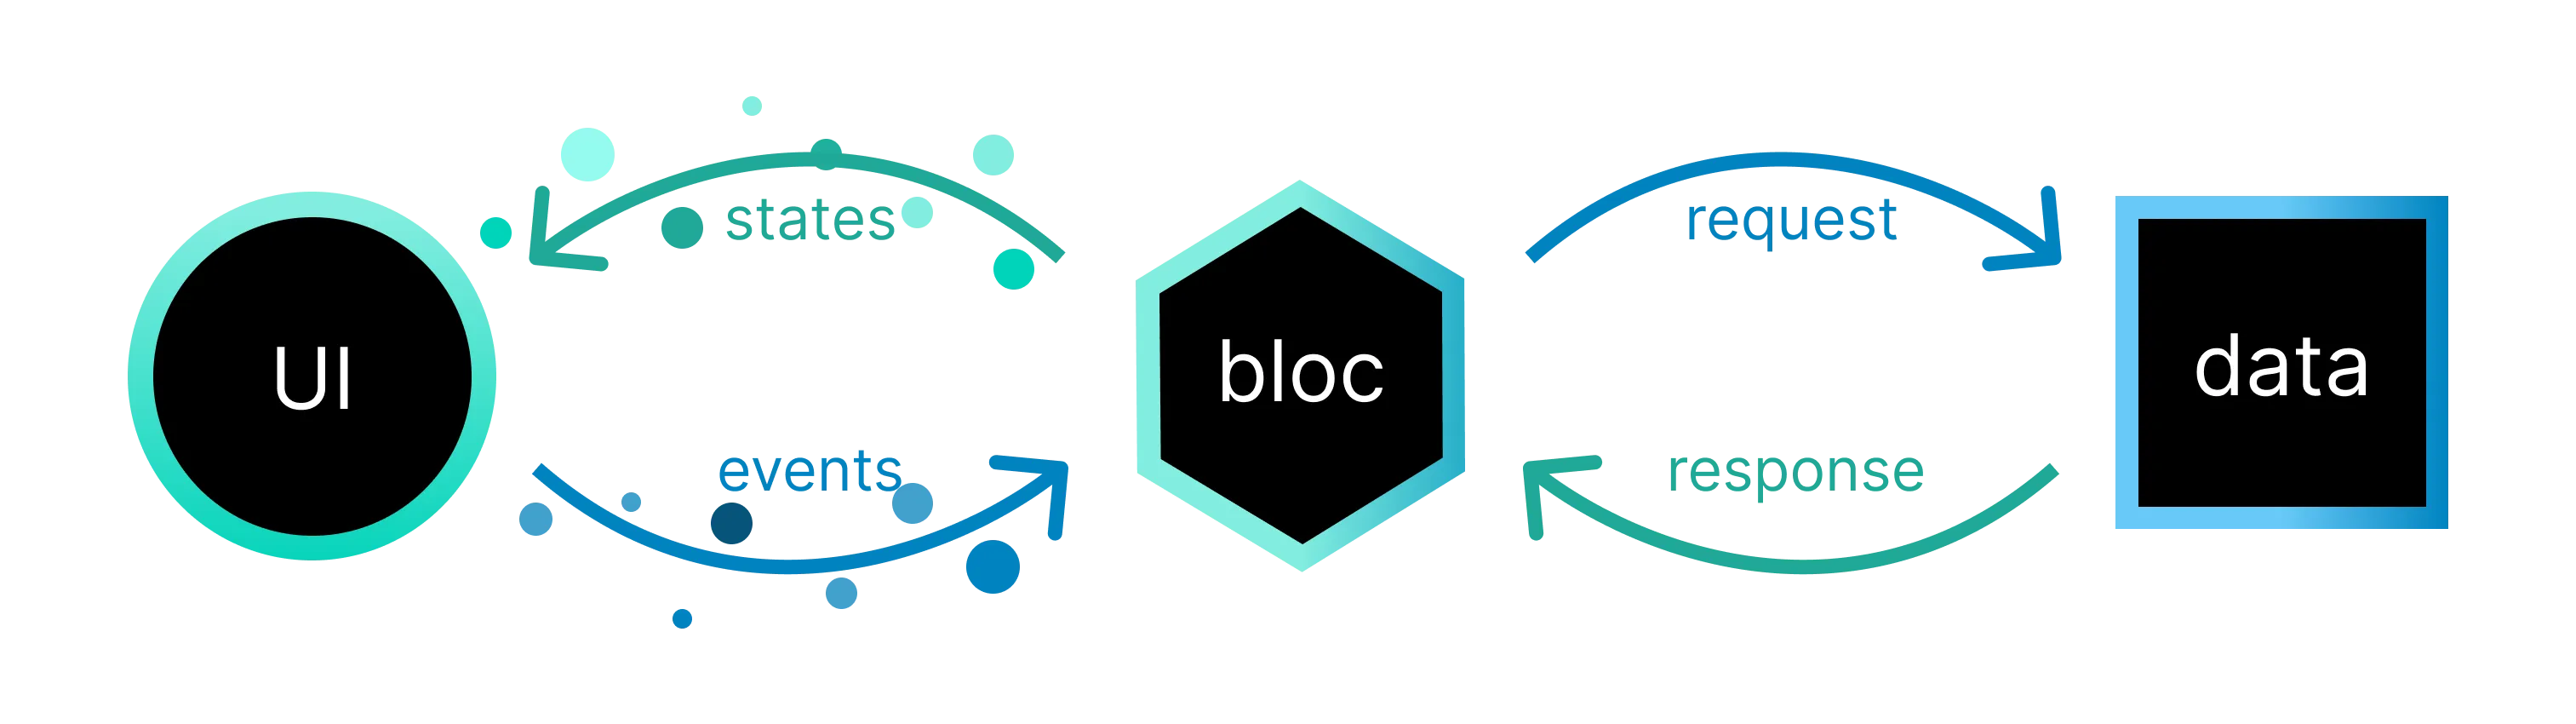 Image from Bloc documentation website.
Breaking down the overall architecture of my application, it would look like this:
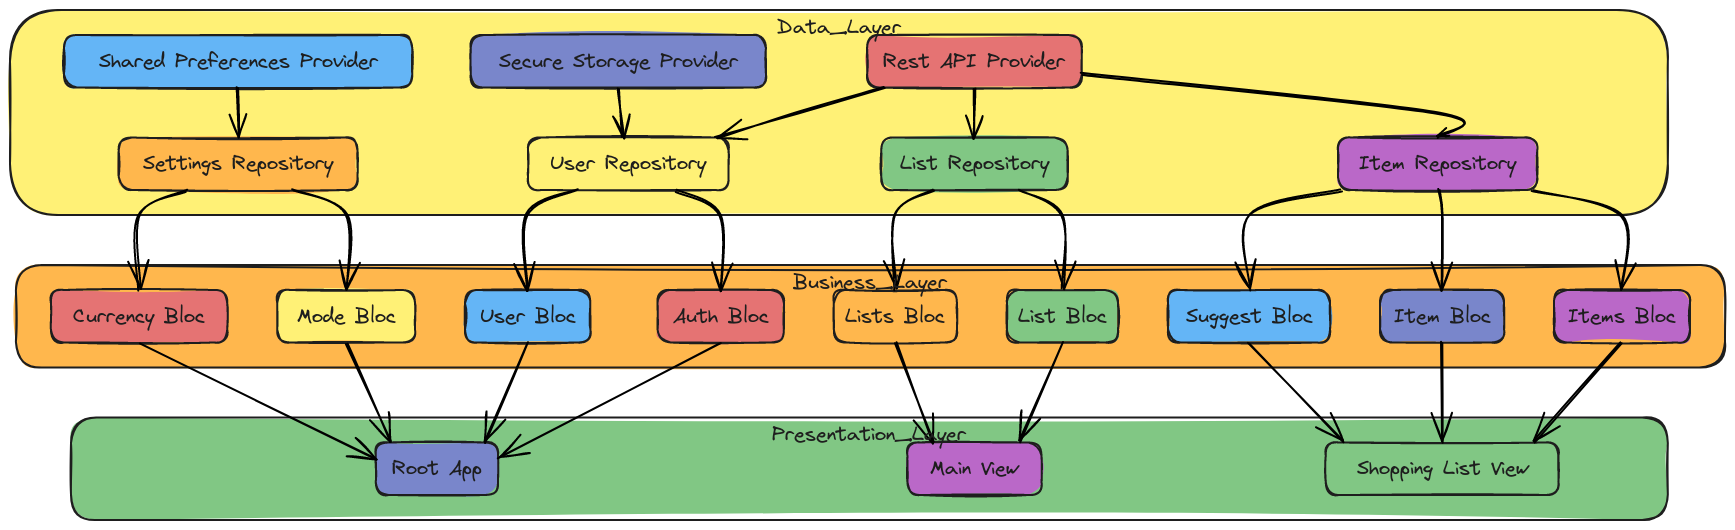
In the data layer, we’ll require data providers to serve as the interface between our application and various data sources. These providers will be:
- A Rest API Provider for interacting with the backend API developed in the previous post.
- A Shared Preferences Provider for managing simple key-value data locally on the device.
- A Secure Storage Provider for storing sensitive information, such as JWT tokens, in an encrypted format.
To encapsulate specific data access logic, we’ll create repositories. Each repository will interact with one or more data providers:
- Settings Repository will handle reading and writing settings (e.g., currency, theme) from shared preferences.
- User Repository will manage user-related data, including authentication tokens and user profiles, by accessing both the secure storage and the backend API.
- List and Items Repositories will retrieve data from the backend API to populate lists and item details within the application.
Next, we’ll introduce a series of blocs to manage the application’s state and handle user interactions These blocs will serve as a bridge between the UI and the underlying data layer, ensuring a smooth and reactive user experience.
Specific blocs include:
- Currency Bloc: This block will manage the user’s preferred currency, which will be determined from the application settings. Since the currency is required from the very beginning, this block must be initialized at the application startup and connected to the root of the application.
- Theme Bloc: This block will handle the application’s theme, allowing users to switch between light and dark modes. Similar to the Currency Bloc, it needs to be initialized at startup and connected to the root of the application.
- Authentication Bloc: Responsible for managing user authentication and authorization. It will handle user login, registration, and token management. Given that login or registration is often the initial screen, this block will also be initialized at the application startup.
- List and Lists Blocs: This bloc is responsible for fetching and managing a list of shopping lists. It will provide a stream of the current list of lists to the UI and handle operations like creating, updating, and deleting lists. It will be directly tied to the shopping lists view.
- Item and Items Blocs: Handles the items within a specific shopping list. It will provide a stream of items for a given list and handle operations like adding, removing, and updating items. Tied to shopping list view.
- Suggestions Bloc: Provides suggestions for items that can be added to a shopping list. Also connected with shopping list view.
Now that we have an overall architectural foundation, we can start building the actual application.
Application
Data layer
Providers
Here, things are pretty straightforward and the code is uncomplicated. For the Rest API provider, we’re only implementing basic CRUD operations. As always, I’m using the Dio library for making network requests.
class RestAPIProvider{
  final Dio _dio;

  RestAPIProvider({required Dio dio}): _dio = dio;

  Future<dynamic> get(String path, {Object? data, Map<String, dynamic>? queryParameters, Options? options}) async {
    return await _dio.get(path, data: data, queryParameters: queryParameters, options: options);
  }

  Future<dynamic> post(String path, {Object? data, Map<String, dynamic>? queryParameters, Options? options}) async {
    return await _dio.post(path, data: data, queryParameters: queryParameters, options: options);
  }

  Future<dynamic> put(String path, {Object? data, Map<String, dynamic>? queryParameters, Options? options}) async {
    return await _dio.put(path, data: data, queryParameters: queryParameters, options: options);
  }

  Future<dynamic> delete(String path, {Object? data, Map<String, dynamic>? queryParameters, Options? options}) async {
    return await _dio.delete(path, data: data, queryParameters: queryParameters, options: options);
  }
}
For communicating with Shared Preferences, I only need methods to save and read bool and string data types. If I were creating a more advanced, production-ready application, I would probably also need methods to delete and update data.
class SharedPrefsProvider {
  final SharedPreferences _storage;

  SharedPrefsProvider({required SharedPreferences storage }) : _storage = storage;

  Future<bool?> readBool(String key) async {
    return  _storage.getBool(key);
  }

  Future<void> setBool(String key, bool value) async {
    await _storage.setBool(key, value);
  }

  Future<String?> readString(String key ) async {
    return _storage.getString(key);
  }

  Future<void> setString(String key, String value) async {
    await _storage.setString(key, value);
  }
}
For interacting with Secure Storage, I need the ability to read, write, and delete individual and all values.
class SecureStorageProvider {
  final FlutterSecureStorage _storage;

  SecureStorageProvider({required FlutterSecureStorage storage }) : _storage = storage;

  Future<String?> readValue(key) async {
    return await _storage.read(key: key);
  }

  Future<Map<String, String>> readAllValues() async {
    return await _storage.readAll();
  }

  Future<void> writeValue(key, value) async {
    await _storage.write(key: key, value: value);
  }

  Future<void> deleteValue(key) async {
    await _storage.delete(key: key);
  }

  Future<void> deleteAllValues() async {
    await _storage.deleteAll();
  }
}
Repositories
Whenever I build repositories, I always begin by defining an abstract interface. In my opinion, this is crucial for potential future scalability, such as switching the backend that provides data or adding another data source for the same use case. For instance, the app could save data on the server for logged-in users while keeping it locally for others. I’ll start with the repository for Items since it’s likely the most complex, although all the repositories are relatively simple.
abstract class IItemRepository {
  Future<void> createItem(ItemModel item);
  Future<List<ItemModel?>> getItemsByListId(String listId);
  Future<void> updateItem(ItemModel item);
  Future<void> deleteItem(ItemModel item);
  Future<List<String?>> getItemsSuggestions(String query);
}
We need methods for creating items, fetching all items for a specific list, updating items, deleting them, and retrieving a list of suggestions. The required endpoints for these operations were implemented in the previous post.
class ItemRepository implements IItemRepository {
  final RestAPIProvider _restAPIProvider;
  final _itemChangeController = StreamController<String>.broadcast();
  Stream<String> get onItemChanged => _itemChangeController.stream;

  ItemRepository({required RestAPIProvider restAPIProvider})
      : _restAPIProvider = restAPIProvider;

  @override
  Future<void> createItem(ItemModel item) async {
    await _restAPIProvider.post("${Constants.minimalistAPIURL}/items/",
        data: item.toJson());

    if (!_itemChangeController.isClosed) {
      _itemChangeController.add(item.listId);
    }
  }

  @override
  Future<void> deleteItem(ItemModel item) async {
    await _restAPIProvider
        .delete("${Constants.minimalistAPIURL}/items/${item.id}");

    if (!_itemChangeController.isClosed) {
      _itemChangeController.add(item.listId);
    }
  }

  @override
  Future<List<ItemModel?>> getItemsByListId(String listId) async {
    final response = await _restAPIProvider
        .get("${Constants.minimalistAPIURL}/items/$listId");

    List<ItemModel?> itemModels = (response.data["items"] as List)
        .map((json) => ItemModel.fromJson(json))
        .toList();

    return itemModels;
  }

  @override
  Future<void> updateItem(ItemModel item) async {
    await _restAPIProvider.put("${Constants.minimalistAPIURL}/items/${item.id}",
        data: item.toJson());

    if (!_itemChangeController.isClosed) {
    _itemChangeController.add(item.listId);
    }
  }

  @override
  Future<List<String?>> getItemsSuggestions(String query) async {
    final response = await _restAPIProvider
        .get("${Constants.minimalistAPIURL}/items/suggest/?query=$query");


    final List<String?> items = (response.data as List).map((item) => item as String?).toList();

    return items;
  }
}
The implementation of individual methods doesn’t include anything particularly unusual. They all rely on the previously created data models. As always, I use the freezed library during the data model creation process. This library helps generate boilerplate code for data classes, including serialization and other commonly required methods. It significantly speeds up the development process and keeps the code clean.
@freezed
class ItemModel with _$ItemModel {
  const factory ItemModel({
    String? id,
    required String name,
    String? description,
    required String creatorId,
    String? creationDate,
    bool? isChecked,
    required String listId,
    double? quantity,
    String? unit,
    double? price

  }) = _ItemModel;

  factory ItemModel.fromJson(Map<String, dynamic> json) => _$ItemModelFromJson(json);
}
The interesting part is the _itemChangeController in ItemRepository enables reactive communication by notifying other parts of the app about changes to items. When an item is created, it emits the list ID to a stream, allowing the Bloc to listen and trigger a state update by fetching the updated data. This decouples the repository from the state management layer, ensuring seamless and efficient data synchronization.
Here’s the implementation of the UserRepository, which includes a fair amount of logic for handling JWT tokens. This repository not only communicates with the API but also manages token storage and retrieval using secure storage. Below is the code:
abstract class IUserRepository {
  Future<TokensModel> login(String email, String password);
  Future<TokensModel> refresh(String refreshToken);
  Future<void> logout();
  Future<UserModel> getCurrentUser(TokensModel tokens);
  Future<void> createUser(CreateUserModel user);
  Future<TokensModel> getTokens();
}

class UserRepository implements IUserRepository {
  final SecureStorageProvider _secureStorageProvider;
  final RestAPIProvider _restAPIProvider;

  UserRepository({
    required SecureStorageProvider secureStorageProvider,
    required RestAPIProvider restAPIProvider,
  })  : _secureStorageProvider = secureStorageProvider,
        _restAPIProvider = restAPIProvider;

  @override
  Future<void> createUser(CreateUserModel user) async {
    await _restAPIProvider.post(
      "${Constants.minimalistAPIURL}/users/",
      data: user.toJson(),
    );
  }

  @override
  Future<UserModel> getCurrentUser(TokensModel tokens) async {
    final response = await _restAPIProvider.get(
      "${Constants.minimalistAPIURL}/users/me",
      options: Options(
        headers: {"Authorization": "Bearer ${tokens.accessToken}"},
      ),
    );

    return UserModel.fromJson(response.data as Map<String, dynamic>);
  }

  @override
  Future<TokensModel> login(String email, String password) async {
    final response = await _restAPIProvider.post(
      "${Constants.minimalistAPIURL}/users/login",
      data: FormData.fromMap({
        "grant_type": "password",
        "username": email,
        "password": password,
      }),
    );

    final TokensModel tokens = TokensModel.fromJson(response.data as Map<String, dynamic>);

    await _secureStorageProvider.writeValue("accessToken", tokens.accessToken);
    await _secureStorageProvider.writeValue("refreshToken", tokens.refreshToken);

    return tokens;
  }

  @override
  Future<void> logout() async {
    await _secureStorageProvider.deleteAllValues();
  }

  @override
  Future<TokensModel> refresh(String refreshToken) async {
    final response = await _restAPIProvider.get(
      "${Constants.minimalistAPIURL}/users/refresh?token=$refreshToken",
    );

    final TokensModel jwtTokens = TokensModel.fromJson(response.data as Map<String, dynamic>);

    await _secureStorageProvider.writeValue("accessToken", jwtTokens.accessToken);
    await _secureStorageProvider.writeValue("refreshToken", jwtTokens.refreshToken);

    return jwtTokens;
  }

  @override
  Future<TokensModel> getTokens() async {
    final String? accessToken = await _secureStorageProvider.readValue("accessToken");
    final String? refreshToken = await _secureStorageProvider.readValue("refreshToken");

    return TokensModel(
      accessToken: accessToken!,
      refreshToken: refreshToken!,
      tokenType: "bearer",
    );
  }
}
The UserRepository handles token management by securely storing, refreshing, and retrieving tokens using SecureStorageProvider. It abstracts API communication with RestAPIProvider, streamlining actions like login, token refresh, and user data retrieval, providing a clean and modular interface for the app’s business logic.
The repositories for settings and lists don’t introduce anything particularly interesting, so I’ll skip showing their code.
Business layer
In the business layer, I will create blocs that act as a bridge between the presentation layer and the data layer. The Bloc pattern is centered around events, which represent user actions or external triggers, such as clicks on UI elements or API requests, and states, which reflect the current state of the application, such as loading, success, or error. Blocs serve as mediators that take in events, process the corresponding business logic (e.g., fetching or updating data), and emit new states. These states are then used by the presentation layer to dynamically update the user interface, ensuring a reactive and maintainable architecture.
I won’t be showing the code for every bloc, as that would take up too much space. I think showcasing two examples will be enough to illustrate the approach.
Example Blocs
Let’s start with the AuthBloc, which will be responsible for managing the user’s authentication state. It will handle tasks such as determining whether the user is logged in and processing login or logout operations. This bloc will ensure the authentication logic is centralized, making it easier to manage and maintain across the application. In my application, the user can have three authentication states:
- unknown: The default state, where the app doesn’t know whether the user is logged in or not, and it must be determined based on the JWT tokens.
- auth: The user is logged in, and this state provides a
UserModelcontaining the user’s information. - unauth: The user is not logged in, which can occur either after a manual logout or a JWT token verification failure.
enum AuthStatus { unknown, auth, unauth }

class AuthState extends Equatable {
  final AuthStatus status;
  final UserModel? user;

  const AuthState._({
    this.status = AuthStatus.unknown,
    this.user,
  });

  const AuthState.unknown() : this._();

  const AuthState.auth(UserModel user) : this._(status: AuthStatus.auth, user: user);

  const AuthState.unauth() : this._(status: AuthStatus.unauth);

  @override
  List<Object?> get props => [status, user];
}
Here’s a breakdown of the events that can occur in your application related to authentication:
- AuthAppStarted: This event is triggered when the app starts. It is responsible for checking if the user is logged in by verifying the JWT tokens
- AuthLoginRequested: This event is triggered when the user enters their email and password to log in.
- AuthLogoutRequested: This event is triggered when the user clicks the logout button.
sealed class AuthEvent {
  const AuthEvent();
}

final class AuthAppStarted extends AuthEvent {}

final class AuthLoginRequested extends AuthEvent {
  final String email;
  final String password;

  const AuthLoginRequested(this.email, this.password);
}

final class AuthLogoutRequested extends AuthEvent {}
Here’s a look at the code for the bloc itself—showing the connection between events and states.
class AuthBloc extends Bloc<AuthEvent, AuthState> {
  final UserRepository _userRepository;

  AuthBloc({required UserRepository userRepository})
      : _userRepository = userRepository,
        super(const AuthState.unknown()) {
    on<AuthAppStarted>(
      (event, emit) async {
        try {
          final TokensModel currentTokens = await _userRepository.getTokens();

          final TokensModel newTokens =
              await _userRepository.refresh(currentTokens.refreshToken);

          final UserModel user =
              await _userRepository.getCurrentUser(newTokens);
          emit(AuthState.auth(user));
        } catch (e) {
          emit(const AuthState.unauth());
        }
      },
    );

    on<AuthLoginRequested>(
      (event, emit) async {
        try {
          final TokensModel tokens =
              await _userRepository.login(event.email, event.password);
          final UserModel user = await _userRepository.getCurrentUser(tokens);
          emit(AuthState.auth(user));
        } catch (e) {
          emit(const AuthState.unauth());
        }
      },
    );

    on<AuthLogoutRequested>(
      (event, emit) async {
        try {
          await _userRepository.logout();
          emit(const AuthState.unauth());
        } catch (_) {}
      },
    );
  }
}
The default state is set to unknown. When the app starts, the getTokens method from the UserRepository is called to retrieve the JWT tokens. Since the access token usually has a short lifespan and is likely to be expired, we attempt to refresh the tokens using the refresh token. If the access token happens to still be valid, that’s fine—the refresh operation could have been triggered shortly afterward anyway.
Next, we fetch the current user’s information and emit an authenticated state. If any of these operations fail, the user is considered unauthenticated. Based on this state, the app will decide whether to show the login screen or proceed directly to the main screen.
When the user tries to log in, the corresponding method from the repository is executed, just like during the logout process.
Now a breakdown of the ItemBloc structure and how events are processed to manage item-related states.
The ItemState class defines the possible statuses of an item and any associated errors. These states are used to indicate the current status of an item operation:
- normal – The default state when no specific action is being performed.
- created – Indicates that an item was successfully created.
- updated – Indicates that an item was successfully updated.
- deleted – Indicates that an item was successfully deleted.
- error – Used when an operation fails, with the associated error passed in the state.
- loading – Represents an ongoing operation (such as during API requests).
enum ItemStatus{normal, created, updated, deleted, error, loading}

class ItemState extends Equatable{
  final ItemStatus status;
  final Error? error;

  const ItemState._({
    this.status = ItemStatus.normal,
    this.error
  });

  const ItemState.normal() : this._();

  const ItemState.created() : this._(status: ItemStatus.created);

  const ItemState.updated() : this._(status: ItemStatus.updated);

  const ItemState.deleted() : this._(status: ItemStatus.deleted);

  const ItemState.error(Error error) : this._(status: ItemStatus.error, error: error);

  const ItemState.loading() : this._(status: ItemStatus.deleted);


  @override
  List<Object?> get props => [status, error];
}
The ItemBloc handles the following events:
- ItemCreateRequested – Triggered when a new item is created.
- ItemUpdateRequested – Triggered when an existing item is updated.
- ItemDeleteRequested – Triggered when an item is deleted.
Each event is handled by its own method, which communicates with the ItemRepository to execute the corresponding operation. The current state of the operation is then emitted back to the app.
 class ItemBloc extends Bloc<ItemEvent, ItemState> {
  final ItemRepository _itemRepository;

  ItemBloc({required ItemRepository itemRepostiory})
      : _itemRepository = itemRepostiory,
        super(const ItemState.normal()) {
    on<ItemCreateRequested>(_onCreateRequested);
    on<ItemUpdateRequested>(_onUpdateRequested);
    on<ItemDeleteRequested>(_onDeleteRequested);
  }

  Future<void> _onCreateRequested(
      ItemCreateRequested event, Emitter<ItemState> emit) async {
    try {
      await _itemRepository.createItem(event.item);
      emit(const ItemState.created());
    } catch (e) {
      emit(ItemState.error(e as Error));
    }
  }

  Future<void> _onUpdateRequested(
      ItemUpdateRequested event, Emitter<ItemState> emit) async {
    try {
      await _itemRepository.updateItem(event.item);
      emit(const ItemState.updated());
    } catch (e) {
      emit(ItemState.error(e as Error));
    }
  }

  Future<void> _onDeleteRequested(
      ItemDeleteRequested event, Emitter<ItemState> emit) async {
    try {
      await _itemRepository.deleteItem(event.item);
      emit(const ItemState.deleted());
    } catch (e) {
      emit(ItemState.error(e as Error));
    }
  }
The ItemBloc handles three main operations—create, update, and delete—through the _onCreateRequested, _onUpdateRequested, and _onDeleteRequested methods. Each of these methods follows a similar pattern: it starts by emitting a loading state, then calls the appropriate method from the ItemRepository (createItem, updateItem, or deleteItem). If the operation completes successfully, it emits one of the corresponding states—created, updated, or deleted. In case of failure, the method catches the error and emits an error state with the error details.
The blocs for other functionalities are created in a similar manner. Of course, the business logic may vary depending on the specific use case. However, the overall structure—handling events, updating states, and interacting with repositories—remains consistent. There’s no need to present all the code here, as it would take up far too much space.
Presentation
In the presentation layer, it’s also difficult to show the entire code due to its size and repetitive patterns. Therefore, I’ll focus on the key files: the main.dart file, the login screen, the main list view, and the shopping list view. Finally, I’ll show a recording of the entire app in action. Let’s start with the main.dart file.
Main.dart
The main.dart file is the entry point for the Minimalist app. It’s responsible for initializing the necessary services, setting up dependency injection, and configuring global state management using Bloc and RepositoryProvider.
Key Features:
Initialization of Shared Preferences and Secure Storage:
These are used for persistent data storage and managing authentication tokens securely.
WidgetsFlutterBinding.ensureInitialized();
SharedPreferences sharedPrefs = await SharedPreferences.getInstance();
Themes Configuration:
The app supports both light and dark themes using Material 3. Both themes use Colors.orangeAccent as the primary color.
final ThemeData lightTheme = ThemeData(
  useMaterial3: true,
  colorSchemeSeed: Colors.orangeAccent,
  brightness: Brightness.light);

final ThemeData darkTheme = ThemeData(
  useMaterial3: true,
  colorSchemeSeed: Colors.orangeAccent,
  brightness: Brightness.dark);
Dependency Injection and Repositories:
The app injects multiple repositories (UserRepository, ListRepository, ItemRepository, etc.) to handle different aspects of the app’s business logic. These repositories are shared across the app using MultiRepositoryProvider.
 _userRepository = UserRepository(
     secureStorageProvider: _secureStorageProvider,
     restAPIProvider: _restAPIProvider);
Dio Configuration for API Requests:
The Dio library is configured to add an authorization header for all requests. If a request fails due to an expired token (statusCode == 498), the app automatically refreshes the token and retries the request.
 onError: (DioException e, handler) async {
   if (e.response?.statusCode == 498) {
     final refreshToken = await _secureStorage.read(key: 'refreshToken');
     if (refreshToken != null) {
       final TokensModel newTokens = await _userRepository.refresh(refreshToken);
       e.requestOptions.headers['Authorization'] = 'Bearer ${newTokens.accessToken}';
       final response = await Dio().fetch(e.requestOptions);
       return handler.resolve(response);
     }
   }
   return handler.next(e);
 }
MultiBlocProvider for State Management:
The app uses multiple Blocs for different parts of the application. This structure helps keep the state management organized and modular.
  MultiBlocProvider(
    providers: [
      BlocProvider<AuthBloc>(
        create: (BuildContext context) => AuthBloc(userRepository: _userRepository),
      ),
      BlocProvider<UserBloc>(
        create: (BuildContext context) => UserBloc(userRepository: _userRepository),
      ),
      // Other Blocs...
    ],
    child: const AppView(),
  );
AppView
The AppView widget is the core of the presentation layer. It handles navigation, applies the selected theme, and listens for authentication state changes.
Key Features:
Navigator and Bloc Listener:
The app uses a global navigator to manage navigation between screens. The BlocListener listens for changes in the AuthBloc state and navigates to the appropriate screen based on whether the user is authenticated.
BlocListener<AuthBloc, AuthState>(
  listener: (context, state) {
    switch (state.status) {
      case AuthStatus.unauth:
        _navigator.pushAndRemoveUntil(LoginScreen.route(), (route) => false);
        break;
      case AuthStatus.auth:
        _navigator.pushAndRemoveUntil(HomeScreen.route(), (route) => false);
        break;
      case AuthStatus.unknown:
        break;
    }
  },
);
Theme Switching:
The app checks the current mode using ModeBloc and applies the appropriate theme (lightTheme or darkTheme).
BlocBuilder<ModeBloc, ModeState>(
  builder: (context, state) {
    if (state.status == ModeStatus.fetched) {
      return MaterialApp(
        theme: state.mode! ? darkTheme : lightTheme,
        // ...
      );
    }
  },
);
Loading State Handling:
If the app is still fetching the mode or waiting for authentication, it shows a LoadingScreen.
return LoadingScreen();
In summary, the main.dart file sets up the core structure of the app: initializing services, managing global state, and handling navigation and theming. It lays a solid foundation for the rest of the app, ensuring clean separation of concerns and scalability.
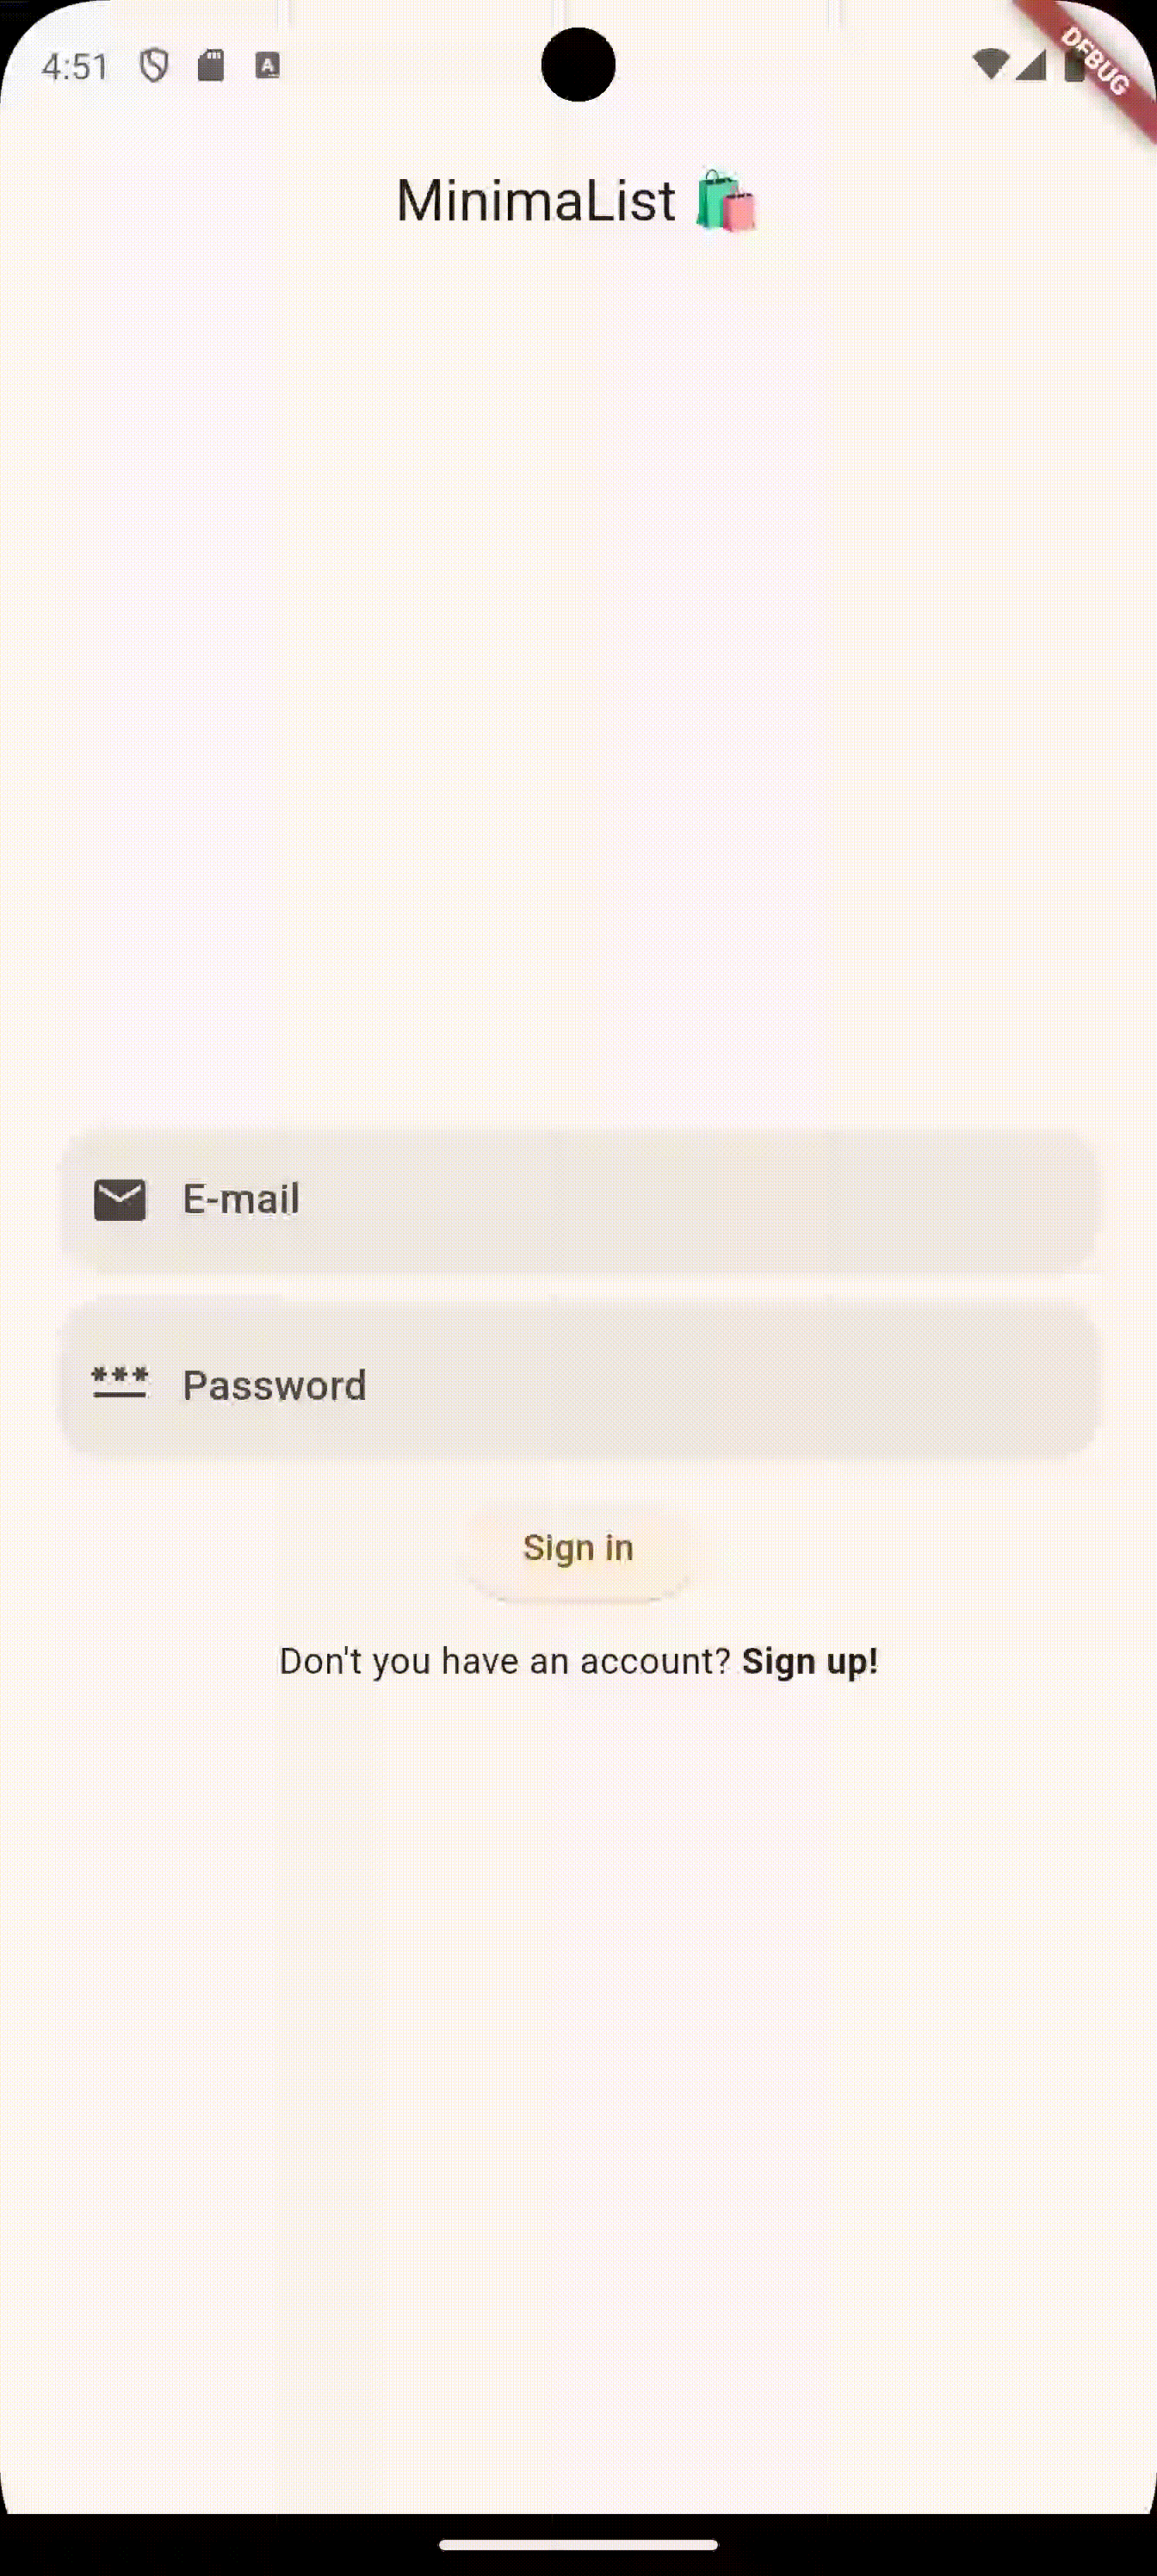
LoginScreen
The LoginScreen provides the user interface for signing in to the Minimalist app. It uses a stateful widget to manage form validation, visibility toggling for the password field, and integration with the authentication flow through AuthBloc.
Key Features:
Email and Password Form Fields
The screen has two text fields for email and password input.
- Email validation checks if the input is a valid email format.
- Password visibility toggle allows the user to show or hide the password.
MyTextFormField(
  controller: _passwordController,
  obscureText: !_passwordVisible,
  suffixIcon: InkWell(
    onTap: () {
      setState(() {
        _passwordVisible = !_passwordVisible;
      });
    },
    child: Icon(_passwordVisible ? Icons.visibility_off : Icons.visibility),
  ),
);
Warning Messages
Two Visibility widgets display error messages when the user tries to submit an empty form or enters an invalid email. These messages are only visible when triggered by validation logic.
Visibility(
  visible: _emptyFieldsWarning,
  child: const Text(
    "Fill in all fields, please 😇",
    style: TextStyle(color: Colors.red, fontWeight: FontWeight.bold),
  ),
);
Form Submission and Validation
When the user taps the Sign in button, the app validates the form:
- If either the email or password field is empty, it shows a warning.
- If the email is in an invalid format, it displays a specific error message.
If validation passes, it triggers theAuthLoginRequestedevent in the AuthBloc with the provided credentials.
if (_emailController.text.isEmpty || _passwordController.text.isEmpty) {
  setState(() {
    _emptyFieldsWarning = true;
  });
  return;
}

if (!RegExp(r'^[a-zA-Z0-9._%+-]+@[a-zA-Z0-9.-]+\.[a-zA-Z]{2,}$')
    .hasMatch(_emailController.text)) {
  setState(() {
    _invalidEmailWarning = true;
    _emptyFieldsWarning = false;
  });
  return;
}

context.read<AuthBloc>().add(
    AuthLoginRequested(_emailController.text, _passwordController.text));
Navigation to Registration Screen
The login screen includes a RichText widget with a link to the registration screen. Tapping Sign up! navigates the user to the RegisterScreen.
RichText(
  text: TextSpan(
    text: "Don't you have an account? ",
    style: DefaultTextStyle.of(context).style,
    children: [
      TextSpan(
        text: "Sign up!",
        style: const TextStyle(fontWeight: FontWeight.bold),
        recognizer: TapGestureRecognizer()
          ..onTap = () {
            Navigator.pushReplacement(context, RegisterScreen.route());
          },
      ),
    ],
  ),
);
Responsiveness
The layout adapts to the screen size. On smaller screens, the form takes up 90% of the screen width. On wider screens, it is constrained to a maximum width of 500 pixels.
SizedBox(
  width: screenWidth < 600 ? screenWidth * 0.9 : 500.0,
  child: Column(
    children: [/* Form fields and buttons */],
  ),
);
The LoginScreen is a well-structured UI for handling user authentication. It includes:
- Input validation and error handling.
- State management with
AuthBlocfor login actions. - Easy navigation to the registration screen.
- Responsive design for a consistent experience across different devices.

Next up is the HomeScreen, which displays the main list of lists.
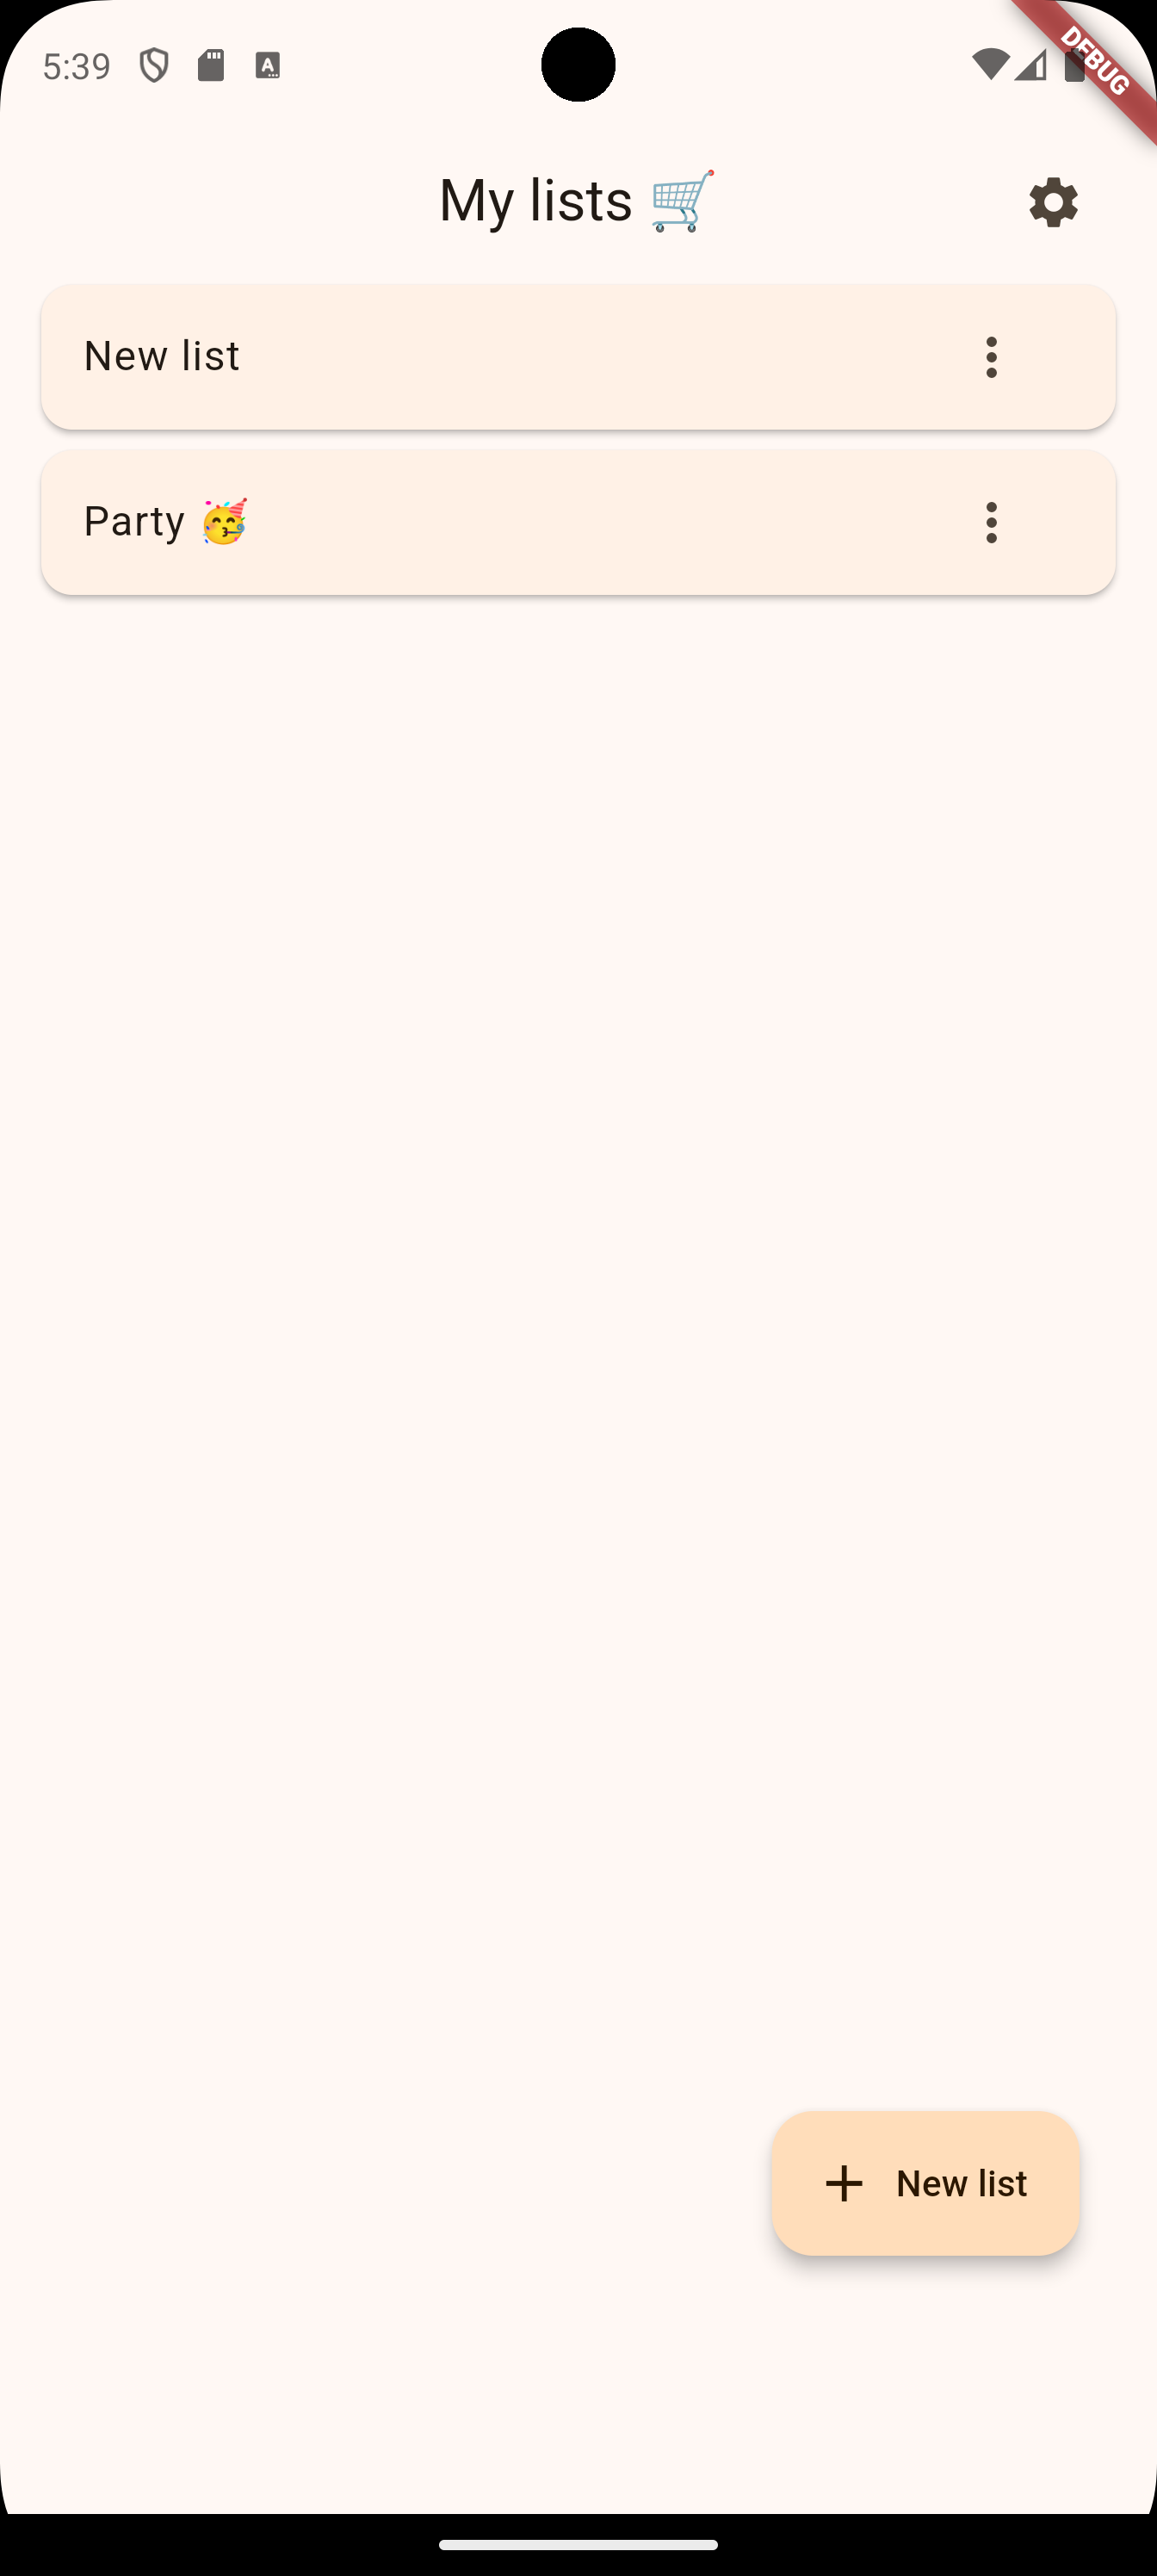
Home screen
The HomeScreen is the core view for managing and displaying user-created shopping lists. It utilizes Bloc state management to keep the UI responsive and organized. Let’s break down its key features:
Bloc Integration for List Management
The screen is powered by two Blocs: ListsBloc (for managing the collection of lists) and ListBloc (for handling individual list operations). These Blocs are injected into the widget tree via MultiBlocProvider to ensure easy state access.
MultiBlocProvider(
  providers: [
    BlocProvider<ListsBloc>(
      create: (context) => ListsBloc(listRepository: listRepository),
    ),
    BlocProvider<ListBloc>(
      create: (context) => ListBloc(listRepostiory: listRepository),
    ),
  ],
  child: BlocBuilder<ListsBloc, ListsState>(builder: (context, state) {
    ...
  }),
);
Dynamic State Handling
Depending on the ListsState status, the UI adapts:
- When the status is
loading, aCircularProgressIndicatoris displayed. - On
error, a simple error message is shown. - On successful data fetching, the screen displays a scrollable list of user-created lists.
if (state.status == ListsStatus.loading) {
  return const Center(child: CircularProgressIndicator());
} else if (state.status == ListsStatus.error) {
  return const Center(child: Text("Something went wrong..."));
}
Displaying Lists with ListView
The fetched lists are displayed in a ListView.builder. Each list item is rendered using the MyListTile widget. When tapped, the app navigates to the ListScreen for the selected list. This structure keeps the UI modular and clean.
Expanded(
  child: ListView.builder(
    itemCount: state.lists.length,
    itemBuilder: (context, index) {
      return MyListTile(
        listModel: state.lists[index]!,
        onTap: () {
          Navigator.of(context).push(MaterialPageRoute(
            builder: (context) => ListScreen(list: state.lists[index]!),
          ));
        },
      );
    },
  ),
)
Floating Action Button for Adding New Lists
A floating action button (FAB) allows users to create a new shopping list. It opens a modal bottom sheet with a form to input the new list’s name.
MyFab(
  onPressed: () {
    showModalBottomSheet(
      context: context,
      builder: (context) {
        return MyListModal(
          title: "Create a list 📋",
          hintText: "New list",
          isUpdate: false,
        );
      },
    );
  },
  text: "New list",
)
Navigation to Settings
The AppBar includes an icon button that navigates to the SettingsScreen, enabling quick access to user preferences and configurations.
actions: [
  IconButton(
    onPressed: () {
      Navigator.of(context).push(MaterialPageRoute(
        builder: (context) => const SettingsScreen(),
      ));
    },
    icon: const Icon(Icons.settings),
  ),
]
This approach makes HomeScreen both functional and easy to extend. The integration of multiple Blocs and a structured UI ensures smooth performance and a clean user experience.
List screen
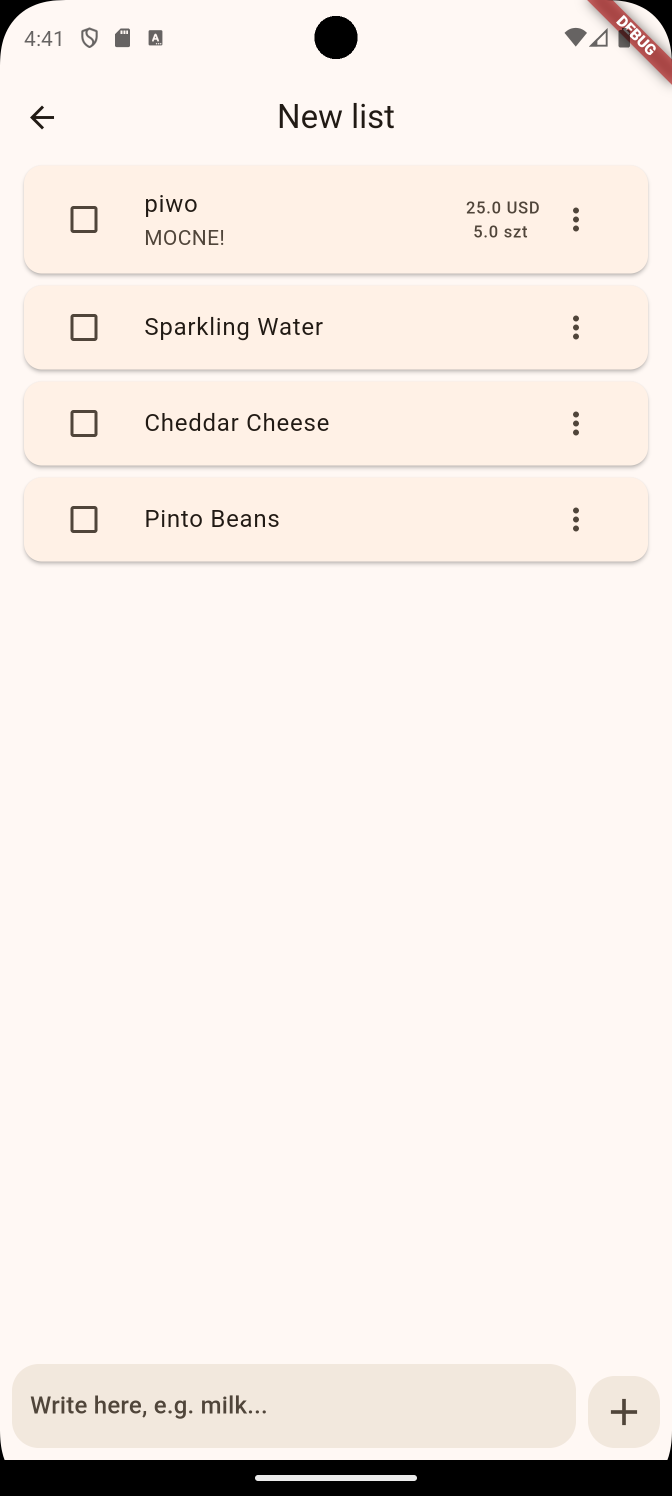
ListScreen is a view where users can browse and manage individual items within a shopping list. Below are its key features:
Bloc Integration for Item Management
The screen uses three Blocs to manage different aspects of the list:
- ItemsBloc – handles fetching and managing the collection of items.
- ItemBloc – manages operations on individual items.
- SuggestBloc – provides item name suggestions based on user input.
MultiBlocProvider(
  providers: [
    BlocProvider<ItemsBloc>(
    create: (context) => ItemsBloc(itemRepository: itemRepository),
  ),
  BlocProvider<ItemBloc>(
    create: (context) => ItemBloc(itemRepostiory: itemRepository),
  ),
  BlocProvider<SuggestBloc>(
    create: (context) => SuggestBloc(itemRepository: itemRepository),
  ),
  ],
  child: BlocBuilder<ItemsBloc, ItemsState>(builder: (context, state) {
    ...
  }),
);
Dynamic State Handling
The ItemsState controls what is displayed on the screen:
- initial – triggers the
ItemsInitialFetchRequestedevent. - loading – shows a loading spinner.
- error – displays an error message.
- success – displays the list of items.
if (state.status == ItemsStatus.loading) {
  return const Center(child: CircularProgressIndicator());
} else if (state.status == ItemsStatus.error) {
  return const Center(child: Text("Something went wrong..."));
}
Animated Item Tiles with AnimatedSwitcher
Items are displayed in an animated list using AnimatedSwitcher. This enhances the user experience with smooth transitions when items are added or removed.
child: AnimatedSwitcher(
  duration: Durations.medium4,
  transitionBuilder: (Widget child, Animation<double> animation) {
    final scaleAnimation = Tween<double>(begin: 0.0, end: 1.0).animate(animation);
    return ScaleTransition(scale: scaleAnimation, child: child);
  },
  child: MyItemTile(
    key: ValueKey(item.id),
    itemModel: item,
  ),
),
Adding New Items with Suggestions
At the bottom of the screen, there’s an AddItem widget that allows users to add new items.
- Real-time Suggestions: While typing,
SuggestBlocfetches suggestions and displays them dynamically. - Validation and Feedback: If the input field is empty, a snackbar notifies the user.
BlocBuilder<SuggestBloc, SuggestState>(
  builder: (context, state) {
    if (state.status == SuggestStatus.loading) {
      return const Center(child: CircularProgressIndicator());
    }
    return Visibility(
      visible: controller.text.isNotEmpty,
      child: Column(
        children: List.generate(state.suggestions.length, (index) {
          return ListTile(
            title: Text(state.suggestions[index]!),
            onTap: () {
              controller.text = state.suggestions[index]!;
            },
          );
        }),
      ),
    );
  },
);
Custom AddItemField with Suggestions
A custom AddItemField component provides a clean and reusable input field for adding new items, with suggestions fetched dynamically.
TextFormField(
  controller: controller,
  onChanged: (value) {
    context.read<SuggestBloc>().add(SuggestFetchRequested(value));
  },
  decoration: InputDecoration(
    hintText: hintText,
    border: OutlineInputBorder(
      borderRadius: BorderRadius.circular(18),
    ),
    fillColor: Theme.of(context).colorScheme.primary.withOpacity(0.1),
    filled: true,
  ),
),
This approach makes ListScreen both functional and easy to extend. The integration of multiple Blocs, real-time suggestions, and a structured UI ensures smooth performance and a seamless user experience.
This is just a small part of the presentation layer code—there’s more in total. The post is already huge, and showing everything doesn’t make sense. This isn’t a tutorial, it’s a story about my brief adventure building this app. Below is a video where I showcase the full demo.
Conclusion
I’m not entirely sure these two posts made sense in terms of value for blog readers. However, they definitely had value for me. I learned the basics of handling a new state management library in Flutter. I also gained knowledge about authentication using JWT tokens. I managed to write the demo for this full-stack app in just three evenings, and I’m happy with that.
Of course, building an app for real users would require much more time and effort. Not to mention resource and security concerns, the mobile layer alone lacks crucial features like analytics, which is essential for success these days.
See you in future posts, which may focus more on working with data—or perhaps continue to be a playground for my various hobby projects.
Cya!